asp.net core 2.0 升級 2.1

升級 2.1 的主要原因是因為從 2.1 開始,微軟加入了 LTS 至少三年的支持:

.NET Core 2.1 will be a long-term support (LTS) release. This means that it is supported for three years. We recommend that you make .NET Core 2.1 your new standard for .NET Core development.

以下說明如何完成升級的每一個步驟

安裝 dotnet core 2.1 SDK

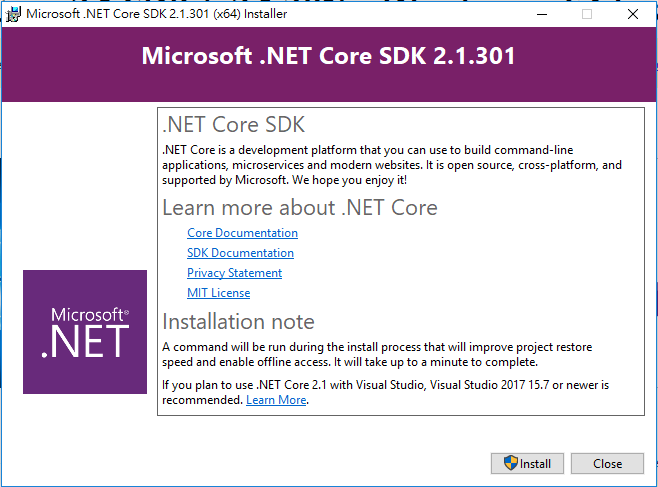
首先要先安裝 dotnet core 2.1 SDK,下圖可以看到目前並只支援 2.0

可以直接點選【安裝其他架構…】就會導入到安裝 dotnet core for VS 的畫面,或者直接到 dotnet core SDK 安裝 下載。執行後就會看到以下安裝畫面,依據畫面指示逐步安裝即可:

安裝完畢後,就可以看到 2.1 的選項:


將現有 asp.net core 2.0 專案升級到 2.1

主要參考官方說明: Migrate from ASP.NET Core 2.0 to 2.1
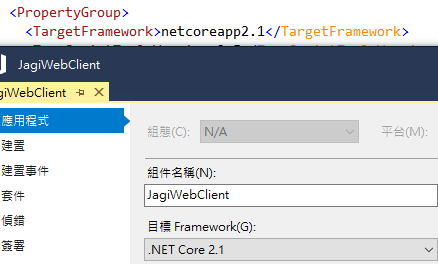
         1. 變更專案為 2.1

可以直接在專案屬性中變更,或者手動調整 TargetFramework 2.0 -> 2.1


2. 變更 nuget package:原先的 .All 變為 .App,同時也沒有版本的設定

  <ItemGroup>
    <PackageReference Include=Microsoft.AspNetCore.All Version=2.0.5 />
    <PackageReference Include=Microsoft.VisualStudio.Web.CodeGeneration.Design Version=2.0.2 />
  </ItemGroup>
改為

  <ItemGroup>
    <PackageReference Include=Microsoft.AspNetCore.App />
    <PackageReference Include=Microsoft.VisualStudio.Web.CodeGeneration.Design Version=2.1.0 PrivateAssets=All />
  </ItemGroup>


        3. 移除 DotnetCliToolReference 這些內容已經改成 Globals 支援了:

  <ItemGroup>
    <DotNetCliToolReference Include=Microsoft.VisualStudio.Web.CodeGeneration.Tools Version=2.0.2 />
  </ItemGroup>


4. 修改 Progarm 呼叫 BuildWebHost 的寫法,改為 CreateWebHostBuilder。這個步驟不修改也是可以執行的(請注意,這個步驟不要執行,因為執行之後可以會造成 update-dabase 失敗Unable to create an object of type ‘xxx’. Add an implementation of

‘IDesignTimeDbContextFactory<xxx>’)。


5. 修改 Startup 的寫法,主要重點是  app.UseBrowserLink(); 已經被移除。

6. 如果有引用到其他專案(例如 UnitTest Project),這時候要注意預設的版本,在這個版本中,單元測試可以忽略 Nuget 許多套件,原因是會自動由 Global 的設定中帶入;但因為我們是由 dotnet core 2.0 升級,預設的套件還是停留在 2.0,因此會跟 reference project 衝突。這時候必須要明確定義有哪些 packages 需要引用;大部分使用以下即可:

    <PackageReference Include=Microsoft.AspNetCore.App Version=2.1.1 />
    <PackageReference Include=Microsoft.EntityFrameworkCore Version=2.1.1 />
    <PackageReference Include=Microsoft.EntityFrameworkCore.InMemory Version=2.1.1 />
    <PackageReference Include=Microsoft.NET.Test.Sdk Version=15.7.2 />
    <PackageReference Include=Moq Version=4.8.3 />
    <PackageReference Include=xunit Version=2.3.1 />
    <PackageReference Include=xunit.runner.visualstudio Version=2.3.1 />
    <DotNetCliToolReference Include=dotnet-xunit Version=2.3.1 />

Angular CLI 正式環境的編譯

正常在開發中,我們常用:

$ ng build –watch

這時候對應的 _Layout.cshtml 為:

<script src=”~/ClientApp/dist/inline.bundle.js”></script>
<script src=”~/ClientApp/dist/polyfills.bundle.js”></script>
<script src=”~/ClientApp/dist/styles.bundle.js”></script>
<script src=”~/ClientApp/dist/vendor.bundle.js”></script>
<script src=”~/ClientApp/dist/main.bundle.js”></script>
</environment>

主要目的在於提供 Chrome 環境可以 debug,並且可以隨時監測程式碼是否有修改,隨時進行編譯。

但衍生的問題是速度會比較慢,尤其在正式環境是不能接受這樣的速度。可以透過 –prod 參數進行正式環境的編譯,會增加以下幾項工作:

The –prod meta-flag engages the following optimization features.

  • Ahead-of-Time (AOT) Compilation: pre-compiles Angular component templates.
  • Production mode: deploys the production environment which enables production mode.
  • Bundling: concatenates your many application and library files into a few bundles.
  • Minification: removes excess whitespace, comments, and optional tokens.
  • Uglification: rewrites code to use short, cryptic variable and function names.
  • Dead code elimination: removes unreferenced modules and much unused code.

更好的方式可以再進一步縮小檔案大小:

$ ng build –prod –build-optimizer

請注意,編譯出來的內容:

<environment include=”Production”>
<script src=”~/clientapp/dist/inline.318b50c57b4eba3d437b.bundle.js”></script>
<script src=”~/clientapp/dist/polyfills.b488325233b482097d13.bundle.js”></script>
<script src=”~/clientapp/dist/main.21c3b35bee403f2837dc.bundle.js”></script>
</environment>

這裡可以使用 asp.net core environment 區隔 Production & Development,同時 Production 的檔案名稱會加入 UUID,因此會隨時異動,如此就可以避免 client cache 所造成問題。

解決 router-outlet 出現顯示疊加的問題

問題描述如下:如果有 master-detail 畫面,在 master 中控制 detail 的顯示(例如:查詢使用 list-component.html, 新增使用 add-component.html),如下圖:

整個頁面的html 設計如下:

<form #form="ngForm" (submit)="retrieveList()" class="form-horizontal" novalidate>
        ...
        <button type="button" class="btn btn-info" (click)="onQuery()">查詢 </button>
        <button type="button" class="btn btn-success" (click)="onAdd()">新增 </button>
    </div>
</form>
 
<router-outlet></router-outlet>

我們再查詢時候,使用 router.navigator:

onQuery() {
    this.router.navigate(["trace/list", this.careType, this.year, this.month]);
}

這時候設定不同條件按下【查詢】一次以上,查出來的資料會不斷的重疊,這是因為實際上查詢出來的資料是放入到 router-outlet 中,因為沒有清除,所以會不斷的累積。

解決方式是導入另外一個 empty-component 顯是空白資料,如下:

@Component({
    selector: 'trace-empty',
    template: '<p>請按下【查詢】資料</p>',
    styles: []
})
export class TraceEmptyComponent {
}

在 child routing 中,設定此 empty routing:

{
    path: 'trace', component: TraceFileComponent,
    children: [
        { path: '', component: TraceEmptyComponent },
        { path: 'list/:type/:year/:month', component: TraceListComponent },
        { path: 'edit/:type/:id', component: TraceEditComponent }
    ]
},

之後,在 input html 中,

<select type="text" name="Month" class="form-control" [ngModel]="month" (ngModelChange)="month=$event; onClear()"> … </select>

指定 onModelChange event 呼叫 onClear() 將畫面跳到 empty component 中:

onClear() {
    this.router.navigate(["trace"]);
}

使用結果會在點選月份時候,將 router-outlet 轉 empty component,然後按下查詢後,就會到真正顯示頁面,藉由 empty component 清空 router-outlet 來避免顯示疊加的問題。

透過 Angular CLI 產生的前端程式在 IE11 無法正確執行

Angular CLI 產生的前端程式一般而言無法正確在 IE 瀏覽器執行,主要有幾個原因:

  • polyfill.ts 必須要修改內容:

Polyfill 本身的目的就是提供一個中介API層,讓舊的瀏覽器可以支援新的API,Angular CLI 自帶的 polyfill.ts (在 src/ 目錄下),預設會註解掉 IE 的支援,將其移除即可(以下還多增加 es7/array 的支援):

  /** IE9, IE10 and IE11 requires all of the following polyfills. **/
 import 'core-js/es6/symbol';
 import 'core-js/es6/object';
 import 'core-js/es6/function';
 import 'core-js/es6/parse-int';
 import 'core-js/es6/parse-float';
 import 'core-js/es6/number';
 import 'core-js/es6/math';
 import 'core-js/es6/string';
 import 'core-js/es6/date';
 import 'core-js/es6/array';
 import 'core-js/es6/regexp';
 import 'core-js/es6/map';
 import 'core-js/es6/weak-map';
 import 'core-js/es6/set';
  /** IE10 and IE11 requires the following for NgClass support on SVG elements */
// import 'classlist.js';  // Run `npm install --save classlist.js`.
  /** IE10 and IE11 requires the following for the Reflect API. */
import 'core-js/es6/reflect';
  /** Evergreen browsers require these. **/
// Used for reflect-metadata in JIT. If you use AOT (and only Angular decorators), you can remove.
import 'core-js/es7/reflect';
import 'core-js/es7/array';
  • 不可以使用 angular 的 forEach

forEach() loop 是 Angular 所提供一個很好的服務,他支援 Async 方式解析陣列的元件;但可惜 IE 11 不支援,因此,若程式需要支援 IE 11,必須要將 forEach() 寫法轉成標準的 for loop。

舉例如下,正常而言,透過 angular forEach 可以直接瀏覽陣列元素:

selections.forEach(item =>
    this.get(item.ItemType, item.ParentCode, item.NeedEmpty)
        .subscribe(data => item.Details = data)
);

一個很重要的議題在於處理 subscribe 針對 http async 的回傳元件,forEach 可以確保 subscribe 中的 item 的值會是當下的 item,如果一般的 loop:

for (var i = 0; i < selections.length; i++) {
    var item = selections[i];
    this.get(item.ItemType, item.ParentCode, item.NeedEmpty)
.subscribe(data => item.Details = data)

這樣寫法是會錯誤的,因為 item 會永遠是最後一筆!
需要改為 透過 function 來設定 item 的內容:

for (var i = 0; i < selections.length; i++) {
    var item = selections[i];
    this.get(item.ItemType, item.ParentCode, item.NeedEmpty, item);
}

get(key, parentCode, needEmpty, codeFile: CodeFile): void {
    this.http.get<Code[]>(this.baseUrl)
        .subscribe(response => {
            let items: Code[] = <Code[]>response;
            codeFile.Details = items;
            this.selections.push(codeFile);
        });
    }
  • Cache 問題:IE 預設會自帶 Cache, 會造成 Angular httpClient 的讀取都是回傳 Cache 的值,因此造成明明有變更但頁面卻無法顯示。解決方式是加上 HttpHeaders diable Cache:
private noCacheHeader: HttpHeaders = new HttpHeaders().set('Cache-Control', 'no-cache').set('Pragma', 'no-cache');
  public getDailyReport(id: number): Observable<DailyReportItem> {
    let params = new HttpParams().set('id', id.toString());
    return this.http.get<DailyReportItem>("/dailyreport/getreport", { params: params, headers: this.noCacheHeader });
}

這裡必須要加入 Cache-Control + Pragma 兩個設定。

整合 ng-busy 套件,http 呼叫可顯示資料載入中的效果

client 需要在 server 存取資料時候,往往會有些等待的時間。透過指示讓使用者知道正在下載中,可以增加使用者的操作體驗。

ng-busy 就是這樣的套件,主要組合包含 css:設定 [ngBusy] 顯示等待的畫面,必須要在每一個 會存取 http component 中添加。

做法如下:


安裝

npm install --save ng-busy

\node_modules\angular2-busy\build\style\busy.css copy wwwroot/css 下,方便後續引用:

<link href="~/css/busy.css" rel="stylesheet" />

在 app.module 中,加入

  import { NgBusyModule } from 'ng-busy';
import { BrowserAnimationsModule } from '@angular/platform-browser/animations';
  @NgModule({
      imports: [
      	// ...
          BrowserAnimationsModule,
          BusyModule
      ],
      // ...
  })

使用方式:

建議使用 Subscription 方案(也可以用 Promise,不過處理步驟就會有些許不同,主要看 http 如何處理):

  import { Subscription } from 'rxjs';
  
// 在 Component 中,定義 busy 變數,並且將 subscribe 結果放入
  busy: Subscription;
  ngOnInit() {
    this.busy = this.data.getNurses(this.clinicCode).subscribe(data => this.nurses = data);
}

html 中,就可以直接呼叫:

<div [ngBusy]=”{busy: busy, message: ‘資料載入中…’}”></div>


如此就會出現下方資料載入中的內容

參考: https://github.com/victos/ng-busy

其中也包含 onBusyStop() & onBusyStart() 兩個 event,可以透過以下方式關聯:

<div [ngBusy]=“…” (busyStop)=“onBusyStop()” (busyStart)=“onBusyStart()”></div>

Visual Studio 使用 Web Deploy 部署到 IIS 方案

適用於 win 2012 srv

如果是 win 2012 以上版本,加入 IIS 管理服務,再打開IIS 就會出現安裝 Microsoft Web Platform 的訊息:

請注意,windows server 要檢查 IIS 管理服務是否已經安裝:

點選【是】就會進入安裝:

安裝 WPI 後,就要安裝 Web Deploy 3.6 for Hosting Servers(只需要安裝這個即可):

安裝完畢後,下一步就要建立專案,同時允許透過 Web Deploy 部署。首先,先建立網站對應的名稱與放置檔案的路徑:

其次,指定【IIS管理員權限】,這裡的重點只在於指定可以登入 windows 的帳號(用來之後在 Visual Studio deploy 設定使用):

接下來就可以在 Visual Studio 設定部署的方式了:


透過 FileSaver 處理檔案下載方案

在 Angular 中,處理檔案下載不是一件容易的事情,主要方法有以下兩種:

1. 透過 anchor 直接將檔案的下載連結放在網頁上:

<a href="/vpn/downloadFile?filename={{item.patientFile}}" class="btn btn-info btn-sm" type="button"
   ng-disabled="!item.patientFile" icon="fa-file-excel-o" target="_self">
    下載 Excel
</a>

其中 /vpn/download 就是用來下載檔案的方式

2. 直接在 angular client code 中處理

最快的方案(而且不需要花費時間)就是透過 HTML 5 FileSaver 套件,引用方式如下:

  • 下載 npm package,這裡同時下載 typescript 定義檔,提供 Intellisense:

npm install file-saver –save

npm install @types/file-saver –save

透過 –save 會直接 update package.json file

  • 透過 http get 下載檔案:
download() {
    this.http.get("/dailyreport/downloadExcel/" + id, { responseType: 'blob' })
        .subscribe(
            data => this.processFile(data),
            error => super.showMessage(AlertType.Danger, error)
        );
}
 
private processFile(data: any) {
    var blob = new Blob([data], { type: 'application/vnd.ms-excel' });
    FileSaver.saveAs(blob, "file.xlsx");
}

注意這裡使用 blob 型態。

  • 在 Server side 將檔案轉成 filestream:
[HttpGet]
public IActionResult DownloadExcel(string filePath)
{
    var fileContents = System.IO.File.ReadAllBytes(filePath);
    return new FileContentResult(fileContents, "application/vnd.ms-excel");
}


EF Core 2.0 Add-Migraion 出現無法建立 DbContext 錯誤

傳統的設定再執行 Add-Migration 會出現錯誤:

PM> Add-Migration InitialCreation

Unable to create an object of type ‘OrderContext’. Add an implementation of ‘IDesignTimeDbContextFactory<OrderContext>’ to the project, or see https://go.microsoft.com/fwlink/?linkid=851728 for additional patterns supported at design time.

這是因為 EF Core 2.0 有改變 Tools 的作法,在 Asp.net core 最佳的解法是:

WebHost.CreateDefaultBuilder(args)

如果是 Console program,可以用 emtpy constructor 的方式:

public class OrderContext : DbContext
{
    public OrderContext() { }
    public OrderContext(DbContextOptions<OrderContext> options) : base(options) { }
    public DbSet<OrderProcess> OrderProcesses { get; set; }
 
    protected override void OnConfiguring(DbContextOptionsBuilder optionsBuilder)
    {
        optionsBuilder.UseSqlServer(@"Server=(localdb)\MSSQLLocalDB;Database=Msmtest;Trusted_Connection=True;");
    }
}

重點在於 OnConfiguring 加上指定的 SqlServer connection。一旦產生 Migration 之後,就可以將 empty constructor comment 掉(因為可能會影響程式的正常邏輯)。

如果有多個 Context,可以在 Add-migration & Update-Database 中指定哪一個要進行更新:

Add-Migration Initial -Context LhcPlatformContext

Update-Database -Context LhcPlatformContext

請注意,如果使用 Seeding the Database 進行資料庫 seeding,那要注意必須要先拿掉 seed data 段落之後才會正確執行,否則會出現: “An error occurred while calling method ‘BuildWebHost’ on class ‘Program’. Continuing without the application service provider.

這個原因是因為我們都是使用 Development 環境在執行,因此會進入到 Seed() 函數,但在 Add-migration 時候實際上並沒有對應的資料庫表格,因此在執行 Seed() 會造成錯誤。

解學方案就是透過檢查 Migration 是否都已經執行後,在進行 Seed,。詳細作法參閱:How to seed your EF Core database

重點在於檢查是否都已經執行 migration:

using (var scope = app.ApplicationServices.CreateScope())
{
    var services = scope.ServiceProvider;
    if (!services.GetService<LhcPlatformContext>().AllMigrationsApplied())
    {
        var context = services.GetRequiredService<LhcPlatformContext>();
        context.Database.Migrate();
        LhcSeedData.Initializer(context);
    }
}

其中 AllMigrationsApplied() 如下:

public static bool AllMigrationsApplied(this DbContext context)
{
    var applied = context.GetService<IHistoryRepository>()
        .GetAppliedMigrations()
        .Select(m => m.MigrationId);
 
    var total = context.GetService<IMigrationsAssembly>()
        .Migrations
        .Select(m => m.Key);
 
    return !total.Except(applied).Any();
}


VS 2017 偵錯時候發生無法連結到Web伺服器 IIS Express

VS 2017 在執行 unit test 發生奇怪的問題,重新啟動後,按下 F5 偵錯,居然發生:

關機再開也沒有用,只好查網路說明了。最常見的說明:

除 .vs/ 目錄,或者重新修改 port 、或者
有人建議刪除 %userprofile%/Documents/IISExpress/config 資料夾,重啟 Visual Studio

但以上我測試結果都不行。,問題一樣發生。查了半天 Stackoverflow 有一篇文章 說可以將 Internet connection sharing 關閉:

果然用這個方式就可以順利解決問題。同時附註:一旦問題排除後,再重新啟動也是沒問題的。至於是麼原因那就只有天知道了…。

整合 Asp.net Core & Angular Cli 混合開發模式

Angular Cli 可以說是目前使用 Angular 2 以上的開發主要啟動方案。透過簡單的命令頁可以快速依據設定加入 component 的內容,降低維護基本的 import 項目的複雜度。可以參考:基本的 Angular Cli 說明

但對於使用 aps.net core 開發的人員而言,以下說明如何將 angular cli 整合到專案內,同時可以獲得兩者的便利性。

  • 首先,在專案目錄下執行 ng new(如果不知道 angular cli command 請參閱上面的說明連結),執行完畢後會產生 angular cli 預設的 source code folder:

這裡包含完整的啟動程式架構,可以透過瀏覽 index.html 進行操作。

  • 將產生的檔案移動到 Asp.net Core 的專案下。要複製兩種內容:

angular 執行程式:指定 angular source code 放入到 任意的指定目錄下(例如:ClientApp\ ),這裡的 source code 就是指 src\ 目錄下的所有內容:

angular cli 的組態設定檔案:就是指跟 src\ 目錄平行的檔案,複製到專案的根目錄下(與 Startup.cs 平行的路徑):

  • 修改變更路徑後的 angular cli 相關組態設定

tsconfig.json 用來編譯 typescript to javascript,修改:

1. outDir 改為 asp.net wwwroot: “outDir”./wwwroot/clientapp/out-tsc”

2. include 改為前面所設定的程式目錄(例如: ClientApp\)

修改 angular-cli.json,同樣將 outDir 改為 wwwroot 目錄

完成相關設定後,就可以在專案目錄下執行 angular cli 了。