Visual Studio 2017 預設文件編碼改為 UTF-8

有些時候在撰寫程式時,會看到最終結果是亂碼:

但在 VS 2017 中的編輯器顯示是正常的:

<button class="btn btn-primary" type="submit"
        [disabled]="form.$pristine || form.$invalid" [faIcon]="'fa-save'">
    存檔
</button>
<button class="btn btn-warning" (click)="cancel(form)" type="button" [faIcon]="'fa-undo'">
    取消

這時可能就是編碼問題了,因為網頁預設採用 utf-8,但實際上VS用 big5 儲存。

修改方向如下:

1. 設定 VS 的編輯選項,將【無法以字碼頁儲存資料時,將文件儲存為 unicode】:

2. 已經寫的文件,可以透過文字檔檔編輯方式改為 utf-8,或者透過另存方式指定編碼:

Asp.net Core 使用 In Memory Caching

Cache 主要目的就是為了減少資料庫存取,加快應用程式速度

但系統的架構設計是,必須要測試是否資料存在 in memory cache,否則就要跟底層的資料庫取得,因為 in memory cache 不保證資料的存在期(也就是他有可能會消失)。

此外,如果是 web farm (代表有多個 web server)就必須要使用 分散式 Cached 機制,確保每台都可以讀取。


使用方式:

加入 package 連結:

"Microsoft.Extensions.Caching.Memory":
"1.0.0-rc2-final",

因為 Cache 是一種 Service,因此要透過 DI 加入:

接下來就可以使用 Constructor injection 呼叫:

Cache 使用方式很簡單,用 Get 取出資料(無 = null),或者用 TryGet 使用 out 取出資料,會回傳 true/false。

用 set 設定資料,並且可以用  MemoryCacheEntryOptions 指定 cache 的有效期間;範例如下:

請注意:預設 MemoryCache 會自動調整 Cache 內容,如果記憶體過大,會自動移除部份內容。可以使用 CacheItemPriority.NeverRemove 讓它不要移除:

如果要移除,就用以下命令:

cache.Remove(cacheKey);

其他內容包含:CancellationTokenSource、Cache Dependencies and
Callbacks
主要用途為控制跟後端資料提供者同步,因使用機會不大,若有需要請自行參考。


如何讓 TagHelper 取出 Model 屬性的特性(Attribute)

客製化 TagHelper 是 Asp.net Core 一個很重要的擴充,允許我們非常方便的建立各種彈性的運用。另外一方面在 Model 中如何定義好屬性(Property),也有相當一部分要透過 Attribute 擴充我們的定義。

以下定義一個 Attribute 用途只為了標註在特定屬性中,可以對應的代碼:

[AttributeUsage(AttributeTargets.Property)]
public class DropdownAttribute : Attribute
{
    public string CodeMap { get; set; }

    public DropdownAttribute(string code)
    {
        this.CodeMap = code;
    }
}

使用方式很簡單,直接在物件中的屬性加入此 Attribute 就可以指定代碼:

public class DailyReportItem
{
    public int Visitors { get; set; }
    
    [Required]
    [Dropdown("DailyProgress")]
    public string Progress { get; set; }
}

現在我們希望可以自訂 TagHelper,用來處理 Required attribute 的內容(上面範例的 DailyProgress)。在轉寫自訂義的 TagHelper,只有一點需要注意:HtmlAttributeName 要使用 ModelExpression 型態,不可以用 String。這裡最大差別在於如果指定 String 則 razor 會傳入值,而非物件本身;但我們需要物件本身用來解析屬性值。

程式碼如下:

public class CustomerTagHelper: TagHelper
{
    [HtmlAttributeName("asp-for")]
    public ModelExpression Source { get; set; }

    public override void Process(TagHelperContext context, TagHelperOutput output)
    {
        output.TagName = "p";
        output.TagMode = TagMode.StartTagAndEndTag;

        var contents = $@"
            Model name: {Source.Metadata.ContainerType.FullName}<br/>
            Property name: {Source.Name}<br/>
            Current Value: {Source.Model}<br/> 
            Is Required: {Source.Metadata.IsRequired}";

        output.Content.SetHtmlContent(new HtmlString(contents));
    }
}

其中 IsRequired 就是代表是否有宣告 required attribute。使用方式跟一般宣告一樣:

<customer asp-for="Name"></customer>

如果需要處理 Dropdown attributte,可以用 MetaData 取出客製化的屬性:

var dropdown = model.Metadata.ContainerType.GetProperty(code)
                    .GetCustomAttributes()
                    .OfType<DropdownAttribute>().FirstOrDefault();

Asp.net core Identity 如何使用既有的 AspnetUser 密碼驗證?

主要重點在於密碼的加密機制,因為 .net framework (MVC5) 使用 IdentityV2,其 hash 的加密方式比較不嚴謹,新版的 dotnet core 使用 IdentityV3 更好的 hash 機制,因此兩者不相容。

修改方案如下:

You just have to add this line in ConfigureServices in Startup.cs:

services.Configure<PasswordHasherOptions>(options =>
    options.CompatibilityMode = PasswordHasherCompatibilityMode.IdentityV2
);

來自 <https://stackoverflow.com/questions/47850720/signinmanager-passwordsigninasync-always-return-failure>

補充說明:

_signInManager.PasswordSignInAsync(model.Email, model.Password, model.RememberMe, lockoutOnFailure: false)

這段寫法第一個雖然是用 EMAIL,但實際上 PASSWORD checking 是用 UserName,因此,如果 UserName = Email 就會正確,否則就必須要先讀出 UserName 才可以正確比對。

此外,新的 IdentityV3 一定要使用 NormalizedUserName property 作為登入的 User name(但 UserName 仍然有使用,兩者最大的差異在於 Normalized 一律轉成大寫)。

Azure WordPress 加入網域名稱

有發現使用 azurewebsites 這樣的網域不容易被搜尋引擎所喜愛,因此文章的散佈度低。想要試試看使用自定義的網域名稱可否加強 SEO。

首先可以使用免費的網域名稱服務: https://nctu.me/ 具體教學可以參閱:《NCTU.ME DOMAIN HOSTING》永久免費網域 – 教學

然而加入之後,要想可以跟 AZURE WEB 連結,還需要設定 A & CNAME,

其中 A 可以透過 AZURE 查詢固定 IP:

查詢正確後,就可以使用 NCTU.ME 的 DNS 服務,加入到 DNS 內:

在這裡設定之後,就需要再 AZURE 中,定義對應的網域:

Design Pattern:Decorator Pattern 說明

主要概念為 Client 只需要 reference Thing object,可以有多種實作方式,並且定義 Decorator 包裝每一個SpecificThiing 的內容。同時,也可以衍生 SpecifiecDecorator 定義特定要包裝的介面,其他的介面就直接透過 Decorator delegate to SpecificThiing,或者做統一的包裝。


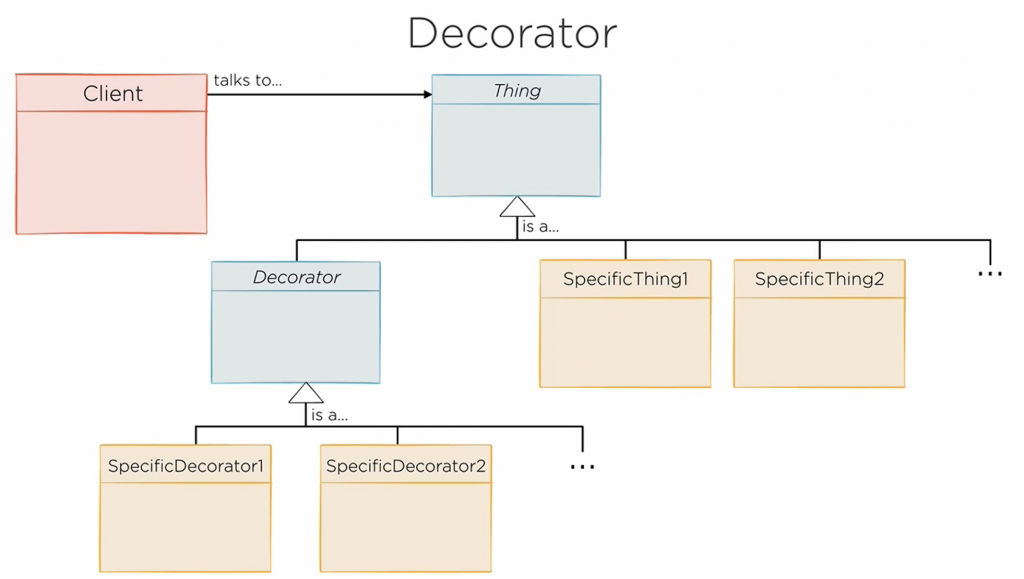
透過 Decorator 將每一個特定條件記錄在特定的 class 內,減少 if 判斷,增加理解能力。

舉例如下:

我們有一個 Hat class 定義:

public interface Hat {
    public String getName();
    public int getPrice();
    public String getDescription();
    public boolean isPremium();
}

主要商品為 StandardHat & PreminumHat

public class StandardHat implements Hat {
    private String name;
    public StandardHat(String name) {
        this.name = name;
    }
    public String getName() {
        return name;
    }
    public int getPrice() {
        return 2000;
    }
    public String getDescription() {
        return getName();
    }
    public boolean isPremium() {
        return false;
    }
}
public class PremiumHat implements Hat {
    private String name;
    public PremiumHat(String name) {
        this.name = name;
    }
 
    public String getName() {
        return name;
    }
 
    public int getPrice() {
        return 3000;
    }
   
    public String getDescription() {
        return getName();
    }
   
    public boolean isPremium() {
        return true;
    }
}

定義 DecoratorHat 處理所有 Decorator 共通的項目(例如回傳名稱):

public abstract class DecoratedHat implements Hat {
 
    private Hat decoratedHat;
 
    protected DecoratedHat(Hat decoratedHat) {
        this.decoratedHat = decoratedHat;
    }
 
    public String getName() {
        return decoratedHat.getName();
    }
 
    protected Hat getDecoratedHat() {
        return decoratedHat;
    }
}

透過 RibbonHat 可以在 Hat 上加裝緞帶:

public class RibbonedHat extends DecoratedHat {
      
    public RibbonedHat(Hat decoratedHat) {
        super(decoratedHat);
    }
   
    public int getPrice() {
        return getDecoratedHat().getPrice() + 100;
    }
   
    public String getDescription() {
        return getDecoratedHat().getDescription() + ", ribboned";
    }
   
    public boolean isPremium() {
        return getDecoratedHat().isPremium();
    }
}

GoldDecorator 塗上金色:

public class GoldenHat extends DecoratedHat {
      
    public GoldenHat(Hat decoratedHat) {
        super(decoratedHat);
    }
   
    public int getPrice() {
        if (isPremium()) {
            return getDecoratedHat().getPrice() + 1000;
        } else {
            return getDecoratedHat().getPrice() + 200;
        }
    }
   
    public String getDescription() {
        return "golden " + getDecoratedHat().getDescription();
    }
   
    public boolean isPremium() {
        return getDecoratedHat().isPremium();
    }
}

Decorator 的使用方式如下:

public void testGoldenRibbonedStandardHat() {
    Hat hat = new RibbonedHat(new GoldenHat(new StandardHat("baseball cap")));
        
    assertThat(hat.getPrice(), is(2300));
    assertThat(hat.getDescription(), is("golden baseball cap, ribboned"));
}


解決 windows 10 KB4054517 一直卡在:準備 windows update 請勿關機

最近遇到一個非常麻煩的問題,只要一重新開機,就會進入到藍色的畫面,顯示:【正在準備 windows,請不要關閉電腦】;然後就不會動,要等好幾個小時才會再次進入到 windows 畫面。最氣人的是:當我們以為這樣就已經更新了,其實不然,下次再重新啟動,還是一樣的問題!

查了下這是一個著名的 99% KB4054517 更新問題,會導致 windows 認為可以執行更新,但其實根本無法完成更新檔下載。

解決方案如下:

  • 先刪除 windows modules installer worker,否則無法停用【服務】

  • 停用 windows update 服務:

  • 打開 C 槽,刪除 c:\windows\SoftwareDistribution 中的 DataStore & Download

  • SoftwareDistribution 目錄命名為: SoftwareDistribution.old


  • windowsupdate 中下載獨立的更新檔案(以 64BIT 為例),並手動安裝更新

  • 最後不要忘記再次打開 windows update 服務


Design Pattern:Adapter Pattern 說明

主要概念:

Client 要使用 CompatibleThing object,但實際的物件介面沒有繼承,因此必須要透過 Adapter 包裝 IncompatibleThing,讓他可以有這樣的介面可以讓 Client 引用。

舉例而言:ShoppingCart 使用 item 項目結帳,但如果我們要直接使用 Hat object 該如何處理?

程式碼如下:

Item Class:

public abstract class Item {
    public abstract String itemName();
    public abstract int itemPrice();
}

Hat Class:

public class Hat { 
    private static final double VAT_PERCENT = 0.2;
    private final String shortName;
    private final String longName;
   
    private final int basePrice;
   
    public Hat(String shortName, String longName, int price) {
        this.shortName = shortName;
        this.longName = longName;
        this.basePrice = price;
    }
   
    public String getShortName() {
        return shortName;
    }
   
    public String getLongName() {
        return longName;
    }
   
    public int getPrice() {
        return (int) (basePrice * (1 + VAT_PERCENT));
    }
}

ShoppingCart Class:

public class ShoppingCart {
   
    private List<Item> items = new LinkedList<>();
   
    public void add(Item item) {
        items.add(item);
    }
   
    public boolean remove(Item item) {
        return items.remove(item);
    }
   
    public long getTotalPrice() {
        long result = 0;
        for (Item item: items) {
            result += item.itemPrice();
        }
        return result;
    }
   
    public String getReceipt() {
        StringBuffer result = new StringBuffer();
        for (Item item: items) {
            result.append(item.itemName() + "\t" + formatMoney(item.itemPrice()) + "\n");
        }
        result.append("----------------------\n");
        result.append("Total:\t\t" + formatMoney(getTotalPrice()) + "\n");
        return result.toString();
    }
   
    private String formatMoney(long money) {
        return "€" + (money / 100) + "." + (money % 100);
    }
}

可以看到 ShoppingCart 只接受 Item object,因此除非 Hat 也要實作 Item 介面,否則不可能傳入到 shoppingCart 中。

解決方案就是建立 Adapter,繼承 Item reference Hat 將他 wrap :

public class HatAdapter extends Item {
   
    private Hat hat;
   
    public HatAdapter(Hat hat) {
        super();
        this.hat = hat;
    }
   
    @Override
    public String itemName() {
        return hat.getShortName();
    }
   
    @Override
    public int itemPrice() {
        return hat.getPrice();
    }
}

如此,就可以將 Hat 傳入到 Adapter ,讓 ShoppingCart 可以直接使用:

public static void main(String[] args) {
     HatAdapter goldenHat = new HatAdapter(new Hat("Golden hat", "Golden hat", 4999));
     HatAdapter pointyHat = new HatAdapter(new Hat("Pointy hat", "Pointy hat", 3000));
     HatAdapter purpleHat = new HatAdapter(new Hat("Purple hat", "Purple hat", 1490));
   
     ShoppingCart cart = new ShoppingCart();
          
     cart.add(goldenHat);
     cart.add(pointyHat);
     cart.add(purpleHat);
          
     cart.remove(pointyHat);
          
     System.out.println(cart.getReceipt());
}

Pattern 架構如下:

新電腦加入舊硬碟方案

最近購買一台新筆電,必須要將舊的 SSD 硬碟加入。

首先需要面對的問題就是要處理磁碟分割,win 10 採用  UEFI,因此都使用 GPT 處理分割,遇到的問題在於會多出一些分割表

其中修復分割區(約300MB)是微軟用來在需要修復系統的情況,供給Windows RE(Windows Recovery Environment)存取之用,這個分割表會變成下圖的【良好(磁碟分割)】:

而這個分割是無法使用上述工具刪除,必須要使用 DISKPART 處理,以下引用 [Win] 刪除修復磁碟分割  圖片說明作法:

請注意這裡的 0, 1, 2 要參考上圖的號碼,否則無法辨識,小心刪除掉目前使用的作業系統磁碟!

接下來就可以初始化磁碟機,同樣採用 GPT 格式建立新的磁碟機了。

SSRS 執行報表發生:使用者資料來源認證錯誤

部屬報表後,若發現以下錯誤:


無法完成目前的動作。使用者資料來源認證不符合執行這份報表或共用資料集的需求。可能是使用者資料來源認證未儲存在報表伺服器資料庫中,或使用者資料來源設定為不需要認證卻未指定自動執行帳戶。 (rsInvalidDataSourceCredentialSetting)

這代表報表本身沒有足夠的權限可以存取資料庫。


這裡很容易造成誤解,因為我們在 VS 2017 報表中,已經指定資料來源,並且也可以正常的測試運作成功,但部屬之後就會出現上面的問題。

問題的原因應該是部屬時候,並沒有正確的指定報表連線方式,因此預設是不需要認證。

解決方式如下:

  1. 指定報表點選【…】,在 context menu 中點選【管理】

  1. 點選【資料來源】,將之改為【使用下列認證】。並且輸入正確的SQL 登入帳密集可。

可以點選【測試連線】判斷是否輸入正確。